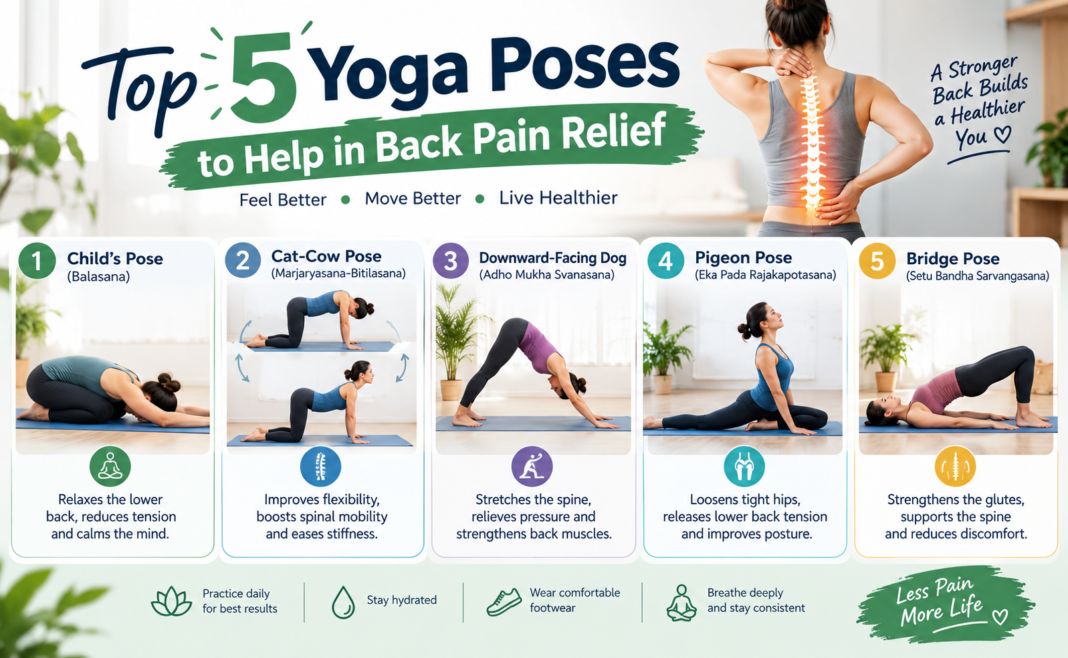


Back pain is one of the most common complaints in the modern world, and for good reason. Long hours at a desk, hours spent hunched over a phone, weak core muscles, and chronic stress all conspire to tighten the hips, compress the spine, and strain the lower back. According to widely cited estimates, a large majority of adults will experience meaningful back pain at some point in their lives. While nothing replaces a proper medical diagnosis, a well-designed yoga practice is one of the most effective and accessible tools for relief, and the research backs it up: studies consistently show that gentle, consistent yoga reduces pain intensity and improves function in people with chronic low back pain.
The key word is gentle. This article covers five yoga poses that specifically target the tissues most often responsible for back pain: the hip flexors, hamstrings, glutes, spinal erectors, and the deep core. Each pose includes a description, the benefits, and how to modify it if you are stiff, injured, or brand new to yoga.
Why Yoga Works for Back Pain
Before getting into the poses, it helps to understand the mechanism. Back pain is rarely just a “back” problem. A person who sits all day typically develops short, tight hip flexors, which tilt the pelvis forward and increase the curve of the lower spine. Tight hamstrings pull the pelvis backward and flatten the lumbar curve. Weak glutes force the lower back to do work the hips should be doing. Meanwhile, the abdominal and deep core muscles that stabilize the spine become underused.
Yoga addresses all of these at once. It lengthens tight muscles, strengthens weak ones, increases blood flow to irritated tissues, and, just as importantly, calms the nervous system. Chronic pain is amplified by stress and fear of movement, and yoga’s emphasis on breath directly counters that cycle. A regular practice of even ten to fifteen minutes a day can be genuinely transformative.
Pose 1: Cat-Cow (Marjaryasana-Bitilasana)
Cat-Cow is the ideal starting pose for almost any back-care routine because it moves the spine through its full range of motion without loading it heavily.
How to do it: Come onto your hands and knees in a tabletop position, with wrists under shoulders and knees under hips. On an inhale, drop your belly, lift your chest forward, and look slightly up. This is Cow. On an exhale, round your spine toward the ceiling, tuck your chin, and draw your navel in. This is Cat. Move slowly and link each movement to your breath, repeating eight to twelve rounds.
Why it helps: The gentle flexion and extension pumps synovial fluid into the spinal joints, warms the surrounding muscles, and reduces stiffness. It also teaches you to coordinate breath with movement, which is the foundation of a safe practice.
Modifications: If your wrists complain, make fists or come onto your forearms. If your knees are sensitive, place a folded blanket underneath them or do a seated version of the same spinal wave in a chair.
Pose 2: Child’s Pose (Balasana)
Child’s Pose is the quintessential resting posture, and for back pain it functions as a gentle traction for the entire spine.
How to do it: From tabletop, bring your big toes together and widen your knees. Shift your hips back toward your heels and walk your hands forward, letting your forehead rest on the mat or a block. Breathe slowly into your back body, feeling the ribs expand. Stay for one to three minutes.
Why it helps: The forward fold creates space between the vertebrae and decompresses the lower back, which is especially welcome after a day of standing or sitting. The wide knees allow the belly to relax, making full diaphragmatic breathing possible. Because the pose is passive, it also downshifts the nervous system, which reduces the muscle guarding that perpetuates pain.
Modifications: If your hips are tight or your knees are uncomfortable, place a bolster or stacked pillows under your torso so you can rest fully without forcing anything. If you are pregnant or have knee issues, keep the knees wide and support the torso higher.
Pose 3: Downward-Facing Dog (Adho Mukha Svanasana)
Downward Dog is often thought of as a hamstring stretch, and it is, but its benefit for the back runs deeper.
How to do it: From tabletop, tuck your toes, lift your knees off the mat, and press your hips up and back, forming an inverted V. Bend your knees generously if needed, and focus on lengthening the spine rather than straightening the legs. Hold for five to eight breaths.
Why it helps: Lengthening the hamstrings directly reduces the pull on the pelvis that contributes to low back pain. The pose also strengthens the shoulders and upper back, and because the heart is above the head, it provides a mild inversion effect that decompresses the spine.
Modifications: If your hamstrings are tight, keep a significant bend in the knees, which actually makes the back stretch deeper. If you have wrist issues, practice at a wall or use a chair, resting your forearms on the seat.
Pose 4: Sphinx Pose (Salamba Bhujangasana)
Sphinx is a gentle backbend that counteracts the rounded posture most of us hold all day.
How to do it: Lie on your belly with your legs extended and hip-width apart. Bring your elbows under your shoulders and rest your forearms on the mat, palms down. Press gently through the forearms to lift your chest, keeping the pubic bone on the floor. Draw your lower ribs slightly in. Hold for one to three minutes, breathing steadily.
Why it helps: Sphinx strengthens the spinal erectors in a supported way and restores the natural curve of the lumbar spine. It also opens the chest and shoulders, which reduces the forward pull that drags the whole spine out of alignment. Because it is a passive, low-load backbend, it is generally well tolerated when deeper backbends are not.
Modifications: If this creates pinching in the lower back, lower the forearms to the mat, reduce the height of the lift, or place a folded blanket under the pelvis. Never force the backbend; let the breath lead.
Pose 5: Supine Twist (Supta Matsyendrasana)
Twisting poses are excellent for releasing tension in the deep spinal muscles and the glutes, both of which commonly refer pain into the lower back.
How to do it: Lie on your back with your knees bent and feet on the floor. Draw your right knee toward your chest, then guide it across your body to the left, keeping the right shoulder grounded. Extend your right arm out to the side and turn your head gently to the right if that feels good. Hold for one to two minutes, then switch sides.
Why it helps: The rotation stretches the deep rotators of the spine, the piriformis, and the glutes, and it creates space in the lumbar joints. It is also deeply relaxing and often produces an audible release of tension.
Modifications: If the twist feels too intense, place a bolster or pillow under the moving knee for support, and keep the twist small. If you are in an acute phase of injury or have a disc issue, consult a professional before twisting.
Putting It Together: A 15-Minute Routine
You do not need an hour-long class to get results. A short daily sequence built from these five poses is enough to make a real difference:
- Cat-Cow, 10 slow rounds, to warm the spine.
- Downward Dog, 5 breaths, with bent knees.
- Sphinx, 1–2 minutes, to gently strengthen the back.
- Child’s Pose, 2 minutes, to decompress.
- Supine Twist, 1–2 minutes per side, to finish and relax.
Move slowly, breathe through your nose, and never push into sharp pain. Mild sensation is fine; a stabbing or shooting feeling is a signal to back off.
Safety and When to See a Doctor
Yoga is supportive care, not a diagnosis. Speak with a physician or physical therapist before starting if you have a recent injury, a herniated disc, spinal stenosis, osteoporosis, or any history of spinal surgery. Seek urgent care for back pain accompanied by numbness in the groin or saddle area, loss of bladder or bowel control, unexplained weight loss, fever, or pain following a significant fall. These are red flags that require prompt medical evaluation.
Final Thoughts
The beauty of these five poses is that they require no equipment, no gym membership, and no special skill. What they do require is consistency. Five to fifteen minutes a day, done with attention and breath, will gradually loosen the hips, strengthen the core and back, calm the nervous system, and reduce the pain that has been limiting your life. Start small, stay patient, and let the practice meet you where you are. Your spine will thank you.